ESP实验专题
esp8266/esp-01芯片


using SPI-mode DOUT which is not in the standard Arduino IDE for ESP8266.
之前ESP8266在烧录时,SPI Mode多数设置的是DIO模式,但是ESP8285则需要使用DOUT模式,所以在下载烧录模块的时候,要将SPI Mode设置为DOUT模式。 Flash Size 也要设置为 1MByte。
CH340G Usb-ttl烧录esp8266

如果是PL2303芯片,Linux系统下可能需要 modprobe pl2303
esp-01检测程序
// ESP8266 库
#include <ESP8266HTTPClient.h>
#include <ESP8266WiFi.h>

int PIN_BUSY=0;

String key,num,value,times;
const char* ssid = "upyun.com";
const char* password = "123123FFFFFF"; // wifi认证用户和密码
const char* ussid = "MyESP";
const char* upassword = "1818181818";

const String httpPost =   "POST / HTTP/1.1\r\n"
                          "Host: shaohy.17geek.us\r\n"
                          "User-Agent: Arduino/1.0\r\n"
                          "Content-Type: application/x-www-form-urlencoded;\r\n"
                          "\r\n";
//WiFiServer server(88);  // esp8266 不作服务端

void setup () {
// 初始化esp8266 wifi无线连接
// WIFI_STA为站点模式,WIFI_AP为访问接入点模式,WIFI_AP_STA为访问接入点和站点的混合模式
  WiFi.mode(WIFI_AP_STA);
  delay(100);

  Serial.printf("Connecting to %s ", ssid); // 连接公司的无线
  WiFi.begin(ssid, password);

  Serial.print("Setting soft-AP ... ");   // 创建自己的WPA2-PSK 无线网络
  Serial.println(WiFi.softAP(ussid, upassword)?"Ready":"Failed!");

  while (WiFi.status() != WL_CONNECTED)
    {
      delay(500);
      Serial.print(".");
    }
  Serial.println(" connected");
  Serial.printf("Web server started, open %s in a web browser\n", WiFi.localIP().toString().c_str());

// 初始化DFPlayer mini
  pinMode(PIN_BUSY, OUTPUT);
  Serial.begin (9600);
}

void loop() {
    delay(1000);
    /*  第一种方式: 利用 web页面 + 定时刷新 获取数据*/
    if(WiFi.status()== WL_CONNECTED){   //Check WiFi connection status
        HTTPClient http;
        http.begin("http://211.155.84.61/shaohy2.php");
        int httpCode = http.POST(httpPost);
        String response = http.getString();
        Serial.println(response);
        http.end();
        int commaIndex = response.indexOf(',');
        int secondCommaIndex = response.indexOf(',', commaIndex+1);
        int thirdCommaIndex = response.indexOf(',',secondCommaIndex+1);
        key = response.substring(0, commaIndex);
        num = response.substring(commaIndex+1, secondCommaIndex);
        value = response.substring(secondCommaIndex+1,thirdCommaIndex);
        times = response.substring(thirdCommaIndex+1);
    }
    else{
        Serial.println("Error in WiFi connection");
    }
    mp3play(key,num.toInt(),value.toInt(),times.toInt());
}

void mp3play(String key,int num,int value,int times){
  if(key=="on") {          // 从网页上读取数据,如果是启用,就开始播放
    for(int i=0;i<times;i++){
    digitalWrite(PIN_BUSY, HIGH);  // turn on LED with voltage HIGH
    delay(value);
    digitalWrite(PIN_BUSY, LOW);  // turn on LED with voltage HIGH
    delay(value);
    }
  }
}
艾尔赛5V WIFI继电器模块

SoftwareSerial的库
5v转3.3v的降压电路

基于ESP-01的MQTT 继电控制
// Arduino MQTT Client 库  https://github.com/knolleary/pubsubclient
#include <PubSubClient.h>

// ESP8266 库
#include <ESP8266HTTPClient.h>
#include <ESP8266WiFi.h>

String key,value,times;
String response;
int relayPin = 0; // 保留用于继电器针脚,可以控制外部电源开关,针对在背面
int ledPin = 2;

WiFiClient espClient;
PubSubClient client(espClient);

const char* ssid = "Upyun-Guest";
const char* password = "XXXX"; // wifi认证用户和密码
const char* mqtt_server = "211.155.84.61";
const int mqtt_port = 1883;
const String httpPost =   "POST / HTTP/1.1\r\n"
                          "Host: shaohy.17geek.us\r\n"
                          "User-Agent: Arduino/1.0\r\n"
                          "Content-Type: application/x-www-form-urlencoded;\r\n"
                          "\r\n";
//WiFiServer server(88);  // esp8266 不作服务端

void ledControl(int key,int value,int times){
  for(int i=0;i<times;i++) {
    digitalWrite(ledPin,HIGH);
    delay(value);                      // wait one second
    digitalWrite(ledPin,LOW);
    delay(value);                      // wait one second
  }
}

void callback(char* topic, byte* payload, unsigned int length) {
    response="";
    Serial.print("-> Message arrived [");
    Serial.print(topic);
    Serial.print("] ");
    for (int i = 0; i < length; i++) {
      Serial.print((char)payload[i]);
      response+=(char)payload[i];
    }
    Serial.println();

    int commaIndex = response.indexOf(',');
    int secondCommaIndex = response.indexOf(',', commaIndex+1);
    int thirdCommaIndex = response.indexOf(',',secondCommaIndex+1);
    key = response.substring(0, commaIndex);
    value = response.substring(commaIndex+1, secondCommaIndex);
    times = response.substring(secondCommaIndex+1,thirdCommaIndex);

    if( key=="on" ) {          // 从网页上读取数据,如果是启用,开始计数并循环
        ledControl(key.toInt(),value.toInt(),times.toInt());
        digitalWrite(relayPin,HIGH);
        delay(1000*(value.toInt()));
        digitalWrite(relayPin,LOW);
    }
}

void reconnect() {
  // Loop until we're reconnected
  while (!client.connected()) {
    Serial.print("-> Attempting MQTT connection...");
    // Create a random client ID
    String clientId = "ESP8266Client-";
    clientId += String(random(0xffff), HEX);
    // Attempt to connect
    if (client.connect(clientId.c_str())) {
      Serial.println("connected");
      // Once connected, publish an announcement...
      client.publish("outTopic",clientId.c_str());
      // ... and resubscribe
      client.subscribe("inTopic");
    } else {
      Serial.print("failed, rc=");
      Serial.print(client.state());
      Serial.println(" try again in 1 seconds");
      delay(1000);
    }
  }
}

void setup()
{
  Serial.begin(115200);
  // 初始化esp8266 wifi无线连接
  WiFi.mode(WIFI_STA);
  delay(100);

  Serial.printf("Connecting to %s ", ssid); // 连接公司的无线
  WiFi.begin(ssid, password);

  while (WiFi.status() != WL_CONNECTED)
    {
      delay(500);
      Serial.print(".");
    }
  Serial.println(" connected");
  Serial.printf("Web server started, open %s in a web browser\n", WiFi.localIP().toString().c_str());

  pinMode(relayPin,OUTPUT);
  pinMode(ledPin,OUTPUT);

  // 初始化Arduino MQTT
  client.setServer(mqtt_server, mqtt_port);
  client.setCallback(callback);
}

void loop() {
    /* MQTT 初始化连接*/
    if (!client.connected()) {
       reconnect();
    }
    client.loop();
//    client.publish("outTopic","hello arduino");
}
基于ESP-01的MQTT 触摸开关
// Arduino MQTT Client 库  https://github.com/knolleary/pubsubclient
#include <PubSubClient.h>

// ESP8266 库
#include <ESP8266HTTPClient.h>
#include <ESP8266WiFi.h>

String key,value,times;
String response;
int relayPin = 0; // ESP-01 的GPIO,默认空脚为高电平,所以,传感器必须要以低电平触发才能正常
int ledPin = 2; // ESP-01 只有两个GPIO,好好利用一下

WiFiClient espClient;
PubSubClient client(espClient);

const char* ssid = "Upyun-Guest";
const char* password = "1688@upyun"; // wifi认证用户和密码
const char* mqtt_server = "211.155.84.61";
const int mqtt_port = 1883;
const String httpPost =   "POST / HTTP/1.1\r\n"
                          "Host: shaohy.17geek.us\r\n"
                          "User-Agent: Arduino/1.0\r\n"
                          "Content-Type: application/x-www-form-urlencoded;\r\n"
                          "\r\n";
//WiFiServer server(88);  // esp8266 不作服务端

void ledControl(int value,int times){
  for(int i=0;i<times;i++) {
    digitalWrite(ledPin,HIGH);
    delay(value);                      // wait one second
    digitalWrite(ledPin,LOW);
    delay(value);                      // wait one second
  }
}

void setup()
{
  Serial.begin(115200);
  // 初始化esp8266 wifi无线连接
  WiFi.mode(WIFI_STA);
  delay(100);

  Serial.printf("Connecting to %s ", ssid); // 连接公司的无线
  WiFi.begin(ssid, password);

  while (WiFi.status() != WL_CONNECTED)
    {
      delay(500);
      Serial.print(".");
    }
  Serial.println(" connected");
  Serial.printf("Web server started, open %s in a web browser\n", WiFi.localIP().toString().c_str());
  pinMode(relayPin,INPUT);
  pinMode(ledPin,OUTPUT);

  // 初始化Arduino MQTT
  client.setServer(mqtt_server, mqtt_port);
}

void loop() {
  delay(500);
  if(WiFi.status()== WL_CONNECTED){   //Check WiFi connection status
    if (!client.connected()){ // 如果没有连接,就先初始化连接
    Serial.print("-> Attempting MQTT connection...");
    String clientId = "ESP8266v31-";
    clientId += String(random(0xffff), HEX);
    // Attempt to connect
    if (client.connect(clientId.c_str())) {
      client.publish("RelayTopic",clientId.c_str()); // 连接成功后,推送信息
        if(digitalRead(relayPin) == LOW){ //默认空脚为高电平,所以,传感器必须要以低电平触发才能正常
          client.publish("RelayTopic","on,180,10");
          ledControl(200,5); // 先给个发送灯
        }
      }
    }
    else{ // 已经建立连接,就可以判 LOW 断是否触摸
      if(digitalRead(relayPin) == LOW){ //默认空脚为高电平,所以,传感器必须要以低电平触发才能正常
          client.publish("RelayTopic","on,180,10");
          ledControl(200,5); // 先给个发送灯
        }
      }
  }
}
基于ESP8266的流媒体播放器
众所周知,ESP8266的规格表将芯片描述为具有一个I2S端口,这是一个可以连接I2S DAC的接口,可以进出芯片的声音。不幸的是,到目前为止,还没有关于这个接口的文件或例子。
我们现在正在研究这些文档和示例,我已经整理了初步文档,并在Espressif的一些同事的帮助下,设计了一个使用HTTP将MP3流(例如webradio)流式传输到一个I2S DAC。它基本上是一个独立的webradio设备,所有的音频流(WiFi,HTTP流,MP3解码)都可以ESP8266中使用。
如果您需要获得良好音频质量的唯一组件,就是用于音频输出的I2S音频DAC和用于缓冲MP3流23LC1024 SPI RAM芯片。对于音质无要求的则不需要这些组件 :)
参考资料
Get MP3 Stream
conn=net.createConnection(net.TCP, 0)
conn:on("receive", function(conn, payload) print(payload) end)
conn:connect(11094, "us1.internet-radio.com")
conn:send("GET / HTTP/1.0\r\n")
conn:send("User-Agent: Wget/1.11.4\r\n")
conn:send("Accept: */*\r\n")
conn:send("Host: us1.internet-radio.com:11094\r\n")
conn:send("Connection: keep-alive\r\n")
conn:send("\r\n")

If I use different User-Agent (for example User-Agent: Mozilla/4.0 (compatible; esp8266 Lua; Windows NT 5.)) it doesn't work (I receive only index.html not raw audio data).
WeMos D1 ESP8266 WiFi 实战

购买和安装硬件包
初始化Wifi连接
#include <ESP8266WiFi.h>
const char* ssid = "shaohy-home";
const char* password = "xxxxxxxxxxxx";

void setup()
{
  Serial.begin(115200);
  Serial.println();

  WiFi.begin(ssid,password);

  Serial.print("Connecting");
  while (WiFi.status() != WL_CONNECTED)
  {
    delay(500);
    Serial.print(".");
  }
  Serial.println();

  Serial.print("Connected, IP address: ");
  Serial.println(WiFi.localIP());
}

void loop() {  }
WeMos D1 Client Get Data
#include <ESP8266WiFi.h>
const char* ssid = "shaohy-home";
const char* password = "xxxxxxxxx";
const char* host = "211.155.84.61";
int port = 80;
int potPin = 0;
int g_speed = 100;

void setup()
{
  Serial.begin(115200);
  Serial.println();

  WiFi.begin(ssid,password);

  Serial.print("Connecting");
  while (WiFi.status() != WL_CONNECTED)
  {
    delay(500);
    Serial.print(".");
  }
  Serial.println();

  Serial.print("Connected, IP address: ");
  Serial.println(WiFi.localIP());
}

void loop() {
  g_speed = analogRead(potPin);

  WiFiClient client;
  Serial.printf("\n===============\n\t%d\n===============\n",g_speed);
  Serial.printf("\n[Connecting to %s ... ", host);
  if (client.connect(host, port))
  {
    Serial.println("connected]");

    Serial.println("[Sending a request]");
    client.print(String("GET /shaohy.php?speed=") + g_speed + " HTTP/1.1\r\n" +
                 "Host: " + host + "\r\n" +
                 "Connection: close\r\n" +
                 "\r\n"
                );

    Serial.println("[Response:]");
    while (client.connected())
    {
      if (client.available())
      {
        String line = client.readStringUntil('\n');
        Serial.println(line);
      }
    }
    client.stop();
    Serial.println("\n[Disconnected]");
  }
  else
  {
    Serial.println("connection failed!]");
    client.stop();
  }
  delay(5000);
  }
WeMos D1 Client Post Data
// ESP8266 库
#include <ESP8266HTTPClient.h>
#include <ESP8266WiFi.h>

String key,value,times;
int count = 0;
int relayPin = 16; // 保留用于继电器针脚,可以控制外部电源开关,针对在背面
const char* ssid = "upyun.com";
const char* password = "XXXXXXXXX"; // wifi认证用户和密码
const String httpPost =   "POST / HTTP/1.1\r\n"
                          "Host: shaohy.17geek.us\r\n"
                          "User-Agent: Arduino/1.0\r\n"
                          "Content-Type: application/x-www-form-urlencoded;\r\n"
                          "\r\n"
                          "type=0&value=123\n";
//WiFiServer server(88);  // esp8266 不作服务端

void ledControl(int key,int value,int times){
  for(int i=0;i<times;i++) {
    digitalWrite(BUILTIN_LED, HIGH);  // turn on LED with voltage HIGH
    delay(value);                      // wait one second
    digitalWrite(BUILTIN_LED, LOW);   // turn off LED with voltage LOW
    delay(value);                      // wait one second
  }
}

void setup()
{
    Serial.begin(115200);
    Serial.printf("Connecting to %s ", ssid);
    WiFi.begin(ssid, password);
    while (WiFi.status() != WL_CONNECTED)
    {
        delay(500);
        Serial.print(".");
    }
    Serial.println(" connected");
    Serial.printf("Web server started, open %s in a web browser\n", WiFi.localIP().toString().c_str());
    pinMode(BUILTIN_LED, OUTPUT);  // initialize onboard LED as output,内置的LED与9同脚
    pinMode(relayPin,OUTPUT);
    // wemos作为客户端发送数据,不作服务器,因为一般用于内部ip
    //server.begin();
}

void loop() {
    delay(3000);  //Send a request every 1 sec, 每隔1s收发消息,初始化 DHT11
    /*  第一种方式: 利用 web页面 + 定时刷新 获取数据*/
    if(WiFi.status()== WL_CONNECTED){   //Check WiFi connection status
        HTTPClient http;
        http.begin("http://211.155.84.61/shaohy.php");
        int httpCode = http.POST(httpPost);
        //http.addHeader("Content-Type", "text/plain");
        //int httpCode2 = http.GET();
        String response = http.getString();
        Serial.println(httpCode);
        Serial.println(response);
        http.end();

        int commaIndex = response.indexOf(',');
        int secondCommaIndex = response.indexOf(',', commaIndex+1);
        key = response.substring(0, commaIndex);
        value = response.substring(commaIndex+1, secondCommaIndex);
        times = response.substring(secondCommaIndex+1);
    }
    else{
        Serial.println("Error in WiFi connection");
    }

    if( key=="on" ) {          // 从网页上读取数据,如果是启用,开始计数并循环
        ledControl(key.toInt(),value.toInt(),times.toInt());
        if(count >= 600){
          digitalWrite(relayPin,LOW);
          count=0;
        }
        else{
          digitalWrite(relayPin,HIGH);
        }
        count++;
                Serial.println(count);
    }
    else{
          digitalWrite(relayPin,LOW);
          count=0;
      }
}
<?php
//echo "<META HTTP-EQUIV=\"Refresh\" content=\"3\">";
//echo date('Y-m-d H:i:s');
//echo $_GET['speed'];

if( $_POST['type'] == 0 ){
        $delay = file_get_contents('/tmp/arduino.txt', true);
        echo "led,".$delay;
}
WeMos D1 with DHT11/22
// ESP8266 库
#include <ESP8266HTTPClient.h>
#include <ESP8266WiFi.h>

// Adafruit 有一系列的传感器,如温度湿度传感器DHT11/DHT22 https://github.com/adafruit/Adafruit_Sensor
#include "DHT.h"
#define DHTPIN 3    // 定义从哪个针脚读取数据
#define DHTTYPE DHT11   // DHT 11 声明传感器类型
DHT dht(DHTPIN, DHTTYPE);

String key,value,times;
int relayPin = 16; // 保留用于继电器针脚,可以控制外部电源开关,针对在背面
const char* ssid = "upyun.com";
const char* password = "XXXXXXXX"; // wifi认证用户和密码
const String httpPost =   "POST / HTTP/1.1\r\n"
                          "Host: shaohy.17geek.us\r\n"
                          "User-Agent: Arduino/1.0\r\n"
                          "Content-Type: application/x-www-form-urlencoded;\r\n"
                          "\r\n"
                          "type=0&value=123\n";
//WiFiServer server(88);  // esp8266 不作服务端

void ledControl(int key,int value,int times){
  for(int i=0;i<times;i++) {
    digitalWrite(BUILTIN_LED, HIGH);  // turn on LED with voltage HIGH
    digitalWrite(relayPin,HIGH);
    delay(value);                      // wait one second
    digitalWrite(BUILTIN_LED, LOW);   // turn off LED with voltage LOW
    digitalWrite(relayPin,LOW);
    delay(value);                      // wait one second
  }
}

void setup()
{
    Serial.begin(115200);
    Serial.printf("Connecting to %s ", ssid);
    WiFi.begin(ssid, password);
    while (WiFi.status() != WL_CONNECTED)
    {
        delay(500);
        Serial.print(".");
    }
    Serial.println(" connected");
    Serial.printf("Web server started, open %s in a web browser\n", WiFi.localIP().toString().c_str());
    pinMode(BUILTIN_LED, OUTPUT);  // initialize onboard LED as output,内置的LED与9同脚
    pinMode(relayPin,OUTPUT);
    // wemos作为客户端发送数据,不作服务器,因为一般用于内部ip
    //server.begin();

    // 初始化dht传感器
    dht.begin();
}

void loop() {
    delay(1000);  //Send a request every 1 sec, 每隔1s收发消息,初始化 DHT11
    float h = dht.readHumidity();
    float t = dht.readTemperature();
    //float f = dht.readTemperature(true);

    // Check if any reads failed and exit early (to try again).
    if (isnan(h) || isnan(t)) {
      Serial.println("Failed to read from DHT sensor!");
      return;
    }

    Serial.print("Humidity: ");
    Serial.print(h);
    Serial.print("%\t");
    Serial.print("Temperature: ");
    Serial.print(t);
    Serial.print("*C\t");
    //Serial.print(f);
    //Serial.print("*F\n");

    /*  第一种方式: 利用 web页面 + 定时刷新 获取数据*/
    if(WiFi.status()== WL_CONNECTED){   //Check WiFi connection status
        HTTPClient http;
        http.begin("http://211.155.84.61/shaohy.php");
        int httpCode = http.POST(httpPost);
        //http.addHeader("Content-Type", "text/plain");
        //int httpCode2 = http.GET();
        String response = http.getString();
        Serial.println(httpCode);
        Serial.println(response);
        http.end();

        int commaIndex = response.indexOf(',');
        int secondCommaIndex = response.indexOf(',', commaIndex+1);
        key = response.substring(0, commaIndex);
        value = response.substring(commaIndex+1, secondCommaIndex);
        times = response.substring(secondCommaIndex+1);
    }
    else{
        Serial.println("Error in WiFi connection");
    }

    if( (key=="on") && (t>=25) ) {          // 从网页上读取数据,如果是启用,并且温度大于28c,就开始闪烁
        ledControl(key.toInt(),value.toInt(),times.toInt());
    }
}
WeMos D1 with MQTT
什么是MQTT
MQTT是一个物联网传输协议,它被设计用于轻量级的发布/订阅式消息传输,旨在为低带宽和不稳定的网络环境中的物联网设备提供可靠的网络服务。MQTT是专门针对物联网开发的轻量级传输协议。MQTT协议针对低带宽网络,低计算能力的设备,做了特殊的优化,使得其能适应各种物联网应用场景。目前MQTT拥有各种平台和设备上的客户端,已经形成了初步的生态系统。
MQTT的优势
MQTT的设计思想是开源、可靠、轻巧、简单,MQTT的传输格式非常精小,最小的数据包只有2个比特,且无应用消息头。MQTT可以保证消息的可靠性,它包括三种不同的服务质量(最多只传一次、最少被传一次、一次且只传一次),如果客户端意外掉线,可以使用“遗愿”发布一条消息,同时支持持久订阅。MQTT在物联网以及移动应用中的优势有:
测试 MQTT
yum install mosquitto.x86_64 mosquitto-clients

mosquitto_sub -d -t outTopic
mosquitto_pub -d -t inTopic -m "on,600,1,23"
// Arduino MQTT Client 库  https://github.com/knolleary/pubsubclient
#include <PubSubClient.h>

// ESP8266 库
#include <ESP8266HTTPClient.h>
#include <ESP8266WiFi.h>

String key,value,times;
const char* mqtt_server = "211.155.84.61";
const int mqtt_port = 1883;

int relayPin = 16; // 保留用于继电器针脚,可以控制外部电源开关,针对在背面
WiFiClient espClient;
PubSubClient client(espClient);

const char* ssid = "upyun.com";
const char* password = "XXXXXXXX"; // wifi认证用户和密码
const String httpPost =   "POST / HTTP/1.1\r\n"
                          "Host: shaohy.17geek.us\r\n"
                          "User-Agent: Arduino/1.0\r\n"
                          "Content-Type: application/x-www-form-urlencoded;\r\n"
                          "\r\n"
                          "type=0&value=123\n";
//WiFiServer server(88);  // esp8266 不作服务端

void ledControl(int key,int value,int times){
  for(int i=0;i<times;i++) {
    digitalWrite(BUILTIN_LED, HIGH);  // turn on LED with voltage HIGH
    digitalWrite(relayPin,HIGH);
    delay(value);                      // wait one second
    digitalWrite(BUILTIN_LED, LOW);   // turn off LED with voltage LOW
    digitalWrite(relayPin,LOW);
    delay(value);                      // wait one second
  }
}

void callback(char* topic, byte* payload, unsigned int length) {
    Serial.print("-> Message arrived [");
    Serial.print(topic);
    Serial.print("] ");
    for (int i = 0; i < length; i++) {
      Serial.print((char)payload[i]);
    }
    Serial.println();
}

void reconnect() {
  // Loop until we're reconnected
  while (!client.connected()) {
    Serial.print("-> Attempting MQTT connection...");
    // Create a random client ID
    String clientId = "ESP8266Client-";
    clientId += String(random(0xffff), HEX);
    // Attempt to connect
    if (client.connect(clientId.c_str())) {
      Serial.println("connected");
      // Once connected, publish an announcement...
      client.publish("outTopic",clientId.c_str());
      // ... and resubscribe
      client.subscribe("inTopic");
    } else {
      Serial.print("failed, rc=");
      Serial.print(client.state());
      Serial.println(" try again in 1 seconds");
      delay(1000);
    }
  }
}

void setup()
{
    Serial.begin(115200);
    Serial.printf("Connecting to %s ", ssid);
    WiFi.begin(ssid, password);
    while (WiFi.status() != WL_CONNECTED)
    {
        delay(500);
        Serial.print(".");
    }
    Serial.println(" connected");
    Serial.printf("Web server started, open %s in a web browser\n", WiFi.localIP().toString().c_str());
    pinMode(BUILTIN_LED, OUTPUT);  // initialize onboard LED as output,内置的LED与9同脚
    pinMode(relayPin,OUTPUT);
    // wemos作为客户端发送数据,不作服务器,因为一般用于内部ip
    //server.begin();

    // 初始化Arduino MQTT
    client.setServer(mqtt_server, mqtt_port);
    client.setCallback(callback);
}

void loop() {
    /* MQTT 初始化连接*/
    if (!client.connected()) {
       reconnect();
    }
    client.loop();
    client.publish("outTopic","hello arduino");
}
WeMos D1 with MQTT & DHT11
参考资料
// Arduino MQTT Client 库  https://github.com/knolleary/pubsubclient
#include <PubSubClient.h>

// ESP8266 库
#include <ESP8266HTTPClient.h>
#include <ESP8266WiFi.h>

// Adafruit 有一系列的传感器,如温度湿度传感器DHT11/DHT22 https://github.com/adafruit/Adafruit_Sensor
#include "DHT.h"
#define DHTPIN 3    // 定义从哪个针脚读取数据
#define DHTTYPE DHT11   // DHT 11 声明传感器类型
DHT dht(DHTPIN, DHTTYPE);

int relayPin = 16; // 保留用于继电器针脚,可以控制外部电源开关,针对在背面

// 定义MQTT返回的数据
String key,value,times,temp;
float h,t,f;
String response;
const char* mqtt_server = "211.155.84.61";
const int mqtt_port = 1883;

WiFiClient espClient;
PubSubClient client(espClient);

const char* ssid = "upyun.com";
const char* password = "XXXXXXXXX"; // wifi认证用户和密码
const String httpPost =   "POST / HTTP/1.1\r\n"
                          "Host: shaohy.17geek.us\r\n"
                          "User-Agent: Arduino/1.0\r\n"
                          "Content-Type: application/x-www-form-urlencoded;\r\n"
                          "\r\n"
                          "type=0&value=123\n";
//WiFiServer server(88);  // esp8266 不作服务端

void ledControl(int key,int value,int times){
  for(int i=0;i<times;i++) {
    digitalWrite(BUILTIN_LED, HIGH);  // turn on LED with voltage HIGH
    digitalWrite(relayPin,HIGH);
    delay(value);                      // wait one second
    digitalWrite(BUILTIN_LED, LOW);   // turn off LED with voltage LOW
    digitalWrite(relayPin,LOW);
    delay(value);                      // wait one second
  }
}

void callback(char* topic, byte* payload, unsigned int length) {
    response="";
    Serial.print("-> Message arrived [");
    Serial.print(topic);
    Serial.print("] ");
    for (int i = 0; i < length; i++) {
      Serial.print((char)payload[i]);
      response+=(char)payload[i];
    }
    Serial.println();

    int commaIndex = response.indexOf(',');
    int secondCommaIndex = response.indexOf(',', commaIndex+1);
    int thirdCommaIndex = response.indexOf(',',secondCommaIndex+1);
    key = response.substring(0, commaIndex);
    value = response.substring(commaIndex+1, secondCommaIndex);
    times = response.substring(secondCommaIndex+1,thirdCommaIndex);
    temp = response.substring(thirdCommaIndex+1);

    if( key=="on" && t>=temp.toInt()) {          // 从网页上读取数据,如果是启用,并且温度大于28c,就开始闪烁
        ledControl(key.toInt(),value.toInt(),times.toInt());
    }
}

void reconnect() {
  // Loop until we're reconnected
  while (!client.connected()) {
    Serial.print("-> Attempting MQTT connection...");
    // Create a random client ID
    String clientId = "ESP8266Client-";
    clientId += String(random(0xffff), HEX);
    // Attempt to connect
    if (client.connect(clientId.c_str())) {
      Serial.println("connected");
      // Once connected, publish an announcement...
      client.publish("outTopic",clientId.c_str());
      // ... and resubscribe
      client.subscribe("inTopic");
    } else {
      Serial.print("failed, rc=");
      Serial.print(client.state());
      Serial.println(" try again in 1 seconds");
      delay(1000);
    }
  }
}

void setup()
{
// 初始化esp8266 wifi无线连接
// WIFI_STA为站点模式,WIFI_AP为访问接入点模式,WIFI_AP_STA为访问接入点和站点的混合模式
  WiFi.mode(WIFI_AP_STA);
  delay(100);
  WiFi.begin(ssid, password);
  Serial.begin(115200);
  Serial.printf("Connecting to %s ", said);

    while (WiFi.status() != WL_CONNECTED)
    {
        delay(500);
        Serial.print(".");
    }
    Serial.println(" connected");
    Serial.printf("Web server started, open %s in a web browser\n", WiFi.localIP().toString().c_str());
    pinMode(BUILTIN_LED, OUTPUT);  // initialize onboard LED as output,内置的LED与9同脚
    pinMode(relayPin,OUTPUT);
    // wemos作为客户端发送数据,不作服务器,因为一般用于内部ip
    //server.begin();

    // 初始化dht传感器
    dht.begin();

    // 初始化Arduino MQTT
    client.setServer(mqtt_server, mqtt_port);
    client.setCallback(callback);
}

void loop() {
    delay(1000);  //Send a request every 1 sec, 收发消息,初始化 DHT11
    h = dht.readHumidity();
    t = dht.readTemperature();
    f = dht.readTemperature(true);

    // Check if any reads failed and exit early (to try again).
    if (isnan(h) || isnan(t)) {
      Serial.println("Failed to read from DHT sensor!");
      return;
    }

    Serial.print("Humidity: ");
    Serial.print(h);
    Serial.print("%\t");
    Serial.print("Temperature: ");
    Serial.print(t);
    Serial.print("*C\t");
    Serial.print(f);
    Serial.print("*F\n");

    /*  float to string 浮点数转换为字符串,用sprintf方式*/
    char str[50];
    sprintf(str, "Humidity:%.1f\tTemperature: %.1f", h,t);
    client.publish("outTopic",str);

    /* MQTT 长连接
    顺序很重要,一定要等到温湿度传感器有数据才操作
    */
    if (!client.connected()) {
       reconnect();
    }
    client.loop();
}
WeMos D1 with WiFi 音乐点播
// ESP8266 库
#include <ESP8266HTTPClient.h>
#include <ESP8266WiFi.h>
#include "Arduino.h"
#include "SoftwareSerial.h"
#include "DFRobotDFPlayerMini.h"

String key,num,value,times;
int oldnum=0,oldvol=0;
const char* ssid = "shaohy-home";
const char* password = "1818181818"; // wifi认证用户和密码
const String httpPost =   "POST / HTTP/1.1\r\n"
                          "Host: shaohy.17geek.us\r\n"
                          "User-Agent: Arduino/1.0\r\n"
                          "Content-Type: application/x-www-form-urlencoded;\r\n"
                          "\r\n";
//WiFiServer server(88);  // esp8266 不作服务端
#define PIN_BUSY D5
SoftwareSerial mySoftwareSerial(D1, D2); // RX, TX
DFRobotDFPlayerMini myDFPlayer;

void setup()
{
// 初始化esp8266 wifi无线连接
// WIFI_STA为站点模式,WIFI_AP为访问接入点模式,WIFI_AP_STA为访问接入点和站点的混合模式
  WiFi.mode(WIFI_AP_STA);
  delay(100);
  WiFi.begin(ssid, password);
  Serial.begin(115200);
  Serial.printf("Connecting to %s ", ssid);

  while (WiFi.status() != WL_CONNECTED)
    {
      delay(500);
      Serial.print(".");
    }
  Serial.println(" connected");
  Serial.printf("Web server started, open %s in a web browser\n", WiFi.localIP().toString().c_str());

// 初始化DFRobot Player
  pinMode(PIN_BUSY, INPUT);
  mySoftwareSerial.begin(9600);
  Serial.println();
  Serial.println(F("DFRobot DFPlayer Mini Demo"));
  Serial.println(F("Initializing DFPlayer ... (May take 3~5 seconds)"));

  delay(1000); // 等SD到位需要一点时间,这个延时很重要,否则初始化不成功
  if (!myDFPlayer.begin(mySoftwareSerial)) {  //Use softwareSerial to communicate with mp3.
    Serial.println(F("Unable to begin:"));
    Serial.println(F("1.Please recheck the connection!"));
    Serial.println(F("2.Please insert the SD card!"));
    while(true);
  }
  Serial.println(F("DFPlayer Mini online."));
}

void mp3play(int num,int value,int times){
  if(oldnum == num ){// 如果是同一首歌
      if(digitalRead(PIN_BUSY) == HIGH){ // 已经停止播放了
        myDFPlayer.volume(value);  //Set volume value (0~30).
        myDFPlayer.play(num);  //Play the number key mp3
        Serial.println(myDFPlayer.readCurrentFileNumber()); //read current play file number
        }
      else{
        delay(1000);
        if(oldvol != value){
        myDFPlayer.volume(value);  //Set volume value (0~30).
        }
      }
  }
  else{
      myDFPlayer.volume(value);  //Set volume value (0~30).
      myDFPlayer.play(num);  //Play the number key mp3
      Serial.println(myDFPlayer.readCurrentFileNumber()); //read current play file number
      oldnum = num;
      oldvol = value;
    }
}

void loop() {
    delay(1000);  //Send a request every 1 sec, 每隔1s收发消息
    /*  第一种方式: 利用 web页面 + 定时刷新 获取数据*/
    if(WiFi.status()== WL_CONNECTED){   //Check WiFi connection status
        HTTPClient http;
        http.begin("http://211.155.84.61/shaohy2.php");
        int httpCode = http.POST(httpPost);
        String response = http.getString();
        Serial.println(response);
        http.end();
        int commaIndex = response.indexOf(',');
        int secondCommaIndex = response.indexOf(',', commaIndex+1);
        int thirdCommaIndex = response.indexOf(',',secondCommaIndex+1);
        key = response.substring(0, commaIndex);
        num = response.substring(commaIndex+1, secondCommaIndex);
        value = response.substring(secondCommaIndex+1,thirdCommaIndex);
        times = response.substring(thirdCommaIndex+1);
    }
    else{
        Serial.println("Error in WiFi connection");
    }

    if(key=="on") {          // 从网页上读取数据,如果是启用,就开始播放
        mp3play(num.toInt(),value.toInt(),times.toInt());
    }
    else{
        myDFPlayer.pause();  //pause the mp3
      }
}
Webduino新型arduino板
参考资料
电子电路知识
上拉电阻"与"下拉电阻
所谓上拉电阻就是:将一个不确定信号(高或低电平),通过一个电阻与电源VCC相连,固定在高电平;
同理下拉电阻就是:将一个不确定信号(高或低电平),通过一个电阻与地GND相连,固定在低电平。
上拉电阻与下拉电阻怎么接线?
二极管和三极管
二极管是控制导线中电子的流动方向,而三极管是控制导线中流动电子的多少。
干电池需要滤波电路吗
当然有必要,原因有二:
驻极体话筒(咪头)
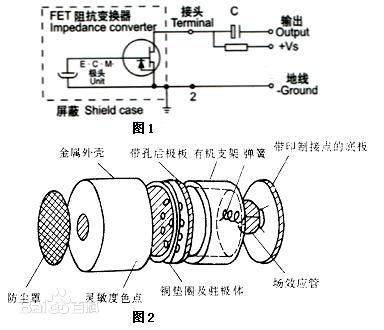
驻极体话筒由声电转换和阻抗变换两部分组成。
声电转换的关键元件是驻极体振动膜。它是一片极薄的塑料膜片,在其中一面蒸发上一层纯金薄膜。然后再经过高压电场驻极后,两面分别驻有异性电荷。膜片的蒸金面向外,与金属外壳相连通。膜片的另一面与金属极板之间用薄的绝缘衬圈隔离开。这样,蒸金膜与金属极板之间就形成一个电容。当驻极体膜片遇到声波振动时,引起电容两端的电场发生变化,从而产生了随声波变化而变化的交变电压。
驻极体话筒内有一个场效应管,与电路的接法有两种:源极输出与漏极输出。

NodeMCU with DFPlayer Mini
参考资料
DFPlayer Mini是一款小巧且价格低廉的MP3模块,可以直接接驳扬声器。模块配合供电电池、扬声器、按键可以单独使用,也可以通过串口控制,作为Arduino UNO或者是任何有串口的单片机的一个模块。模块本身完美的集成了MP3、WAV、WMA的硬解码。同时软件支持TF卡驱动,支持FAT16、FAT32文件系统。通过简单的串口指令即可完成播放指定的音乐,以及如何播放音乐等功能,无需繁琐的底层操作,使用方便,稳定可靠。
产品参数
 + DFPlayer - mp3 music from SD card")


DFPlayer Mini & nodeMCU
#include <DFPlayer_Mini_Mp3.h>
#include <SoftwareSerial.h>

#define PIN_BUSY D5

SoftwareSerial mp3Serial(D1, D2); // RX, TX

void setup () {
  pinMode(PIN_BUSY, INPUT);
  Serial.begin (115200);
  Serial.println("Setting up software serial");
  mp3Serial.begin (9600);
  Serial.println("Setting up mp3 player");
  mp3_set_serial (mp3Serial);
  // Delay is required before accessing player. From my experience it's ~1 sec
  delay(1000);
  mp3_set_volume (10);
}

void loop () {
  if(digitalRead(PIN_BUSY) == HIGH){
    delay(1000);
    Serial.println("play next");
    mp3_next ();  //Play next mp3 every 3 second.
  }
  else{
    Serial.print("Busy: ");
    delay(500);
  }
}
DFPlayer Mini & ESP-01
// ESP8266 库
#include <ESP8266HTTPClient.h>
#include <ESP8266WiFi.h>
#include <DFPlayer_Mini_Mp3.h>
#include <SoftwareSerial.h>

#define PIN_BUSY 0
String key,num,value,times;
int oldnum=0,oldvol=0;
const char* ssid = "upyun.com";
const char* password = "123123FFFFFF"; // wifi认证用户和密码
const String httpPost =   "POST / HTTP/1.1\r\n"
                          "Host: shaohy.17geek.us\r\n"
                          "User-Agent: Arduino/1.0\r\n"
                          "Content-Type: application/x-www-form-urlencoded;\r\n"
                          "\r\n";
//WiFiServer server(88);  // esp8266 不作服务端

void setup () {
// 初始化esp8266 wifi无线连接
// WIFI_STA为站点模式,WIFI_AP为访问接入点模式,WIFI_AP_STA为访问接入点和站点的混合模式
  WiFi.mode(WIFI_AP_STA);
  delay(100);
  WiFi.begin(ssid, password);
  Serial.begin(115200);
  Serial.printf("Connecting to %s ", ssid);

  while (WiFi.status() != WL_CONNECTED)
    {
      delay(500);
      Serial.print(".");
    }
  Serial.println(" connected");
  Serial.printf("Web server started, open %s in a web browser\n", WiFi.localIP().toString().c_str());

// 初始化DFPlayer mini
  pinMode(PIN_BUSY, INPUT);
  mp3_set_serial (Serial);
  Serial.begin (9600);
  Serial.println(F("Initializing DFPlayer ... (May take 1~3 seconds)"));
  delay(1000); // 等SD到位需要一点时间,这个延时很重要,否则初始化不成功
  Serial.println(F("DFPlayer Mini online."));
}

void loop() {
    delay(1000);  //Send a request every 1 sec, 每隔1s收发消息
    /*  第一种方式: 利用 web页面 + 定时刷新 获取数据*/
    if(WiFi.status()== WL_CONNECTED){   //Check WiFi connection status
        HTTPClient http;
        http.begin("http://211.155.84.61/shaohy2.php");
        int httpCode = http.POST(httpPost);
        String response = http.getString();
        Serial.println(response);
        http.end();
        int commaIndex = response.indexOf(',');
        int secondCommaIndex = response.indexOf(',', commaIndex+1);
        int thirdCommaIndex = response.indexOf(',',secondCommaIndex+1);
        key = response.substring(0, commaIndex);
        num = response.substring(commaIndex+1, secondCommaIndex);
        value = response.substring(secondCommaIndex+1,thirdCommaIndex);
        times = response.substring(thirdCommaIndex+1);
    }
    else{
        Serial.println("Error in WiFi connection");
    }

    mp3play(key,num.toInt(),value.toInt(),times.toInt());
}


void mp3play(String key,int num,int value,int times){
  if(key=="on") {          // 从网页上读取数据,如果是启用,就开始播放
    if(oldnum == num ) {  // 如果是同一首歌
      if(digitalRead(PIN_BUSY) == HIGH){ // 已经停止播放了
        mp3_set_volume(value); //Set volume value (0~30).
        mp3_next();  //Play the number key mp3
      }
      else{
        if(oldvol != value){
          mp3_set_volume(value); //Set volume value (0~30).
        }
      }
    }
  else{
    mp3_set_volume(value); //Set volume value (0~30).
    mp3_play(num);  //Play the number key mp3
    oldnum = num;
    oldvol = value;
    }
  }
  else{
    mp3_pause();  //pause the mp3
    oldnum = num;
    oldvol = value;
  }
}
DFRobotDFPlayerMini
#include "Arduino.h"
#include "SoftwareSerial.h"
#include "DFRobotDFPlayerMini.h"
#define PIN_BUSY D5

SoftwareSerial mySoftwareSerial(D1, D2); // RX, TX

DFRobotDFPlayerMini myDFPlayer;
void printDetail(uint8_t type, int value);

void setup()
{
  pinMode(PIN_BUSY, INPUT);
  mySoftwareSerial.begin(9600);
  Serial.begin(115200);

  Serial.println();
  Serial.println(F("DFRobot DFPlayer Mini Demo"));
  Serial.println(F("Initializing DFPlayer ... (May take 3~5 seconds)"));
  delay(1000);

  if (!myDFPlayer.begin(mySoftwareSerial)) {
    //Use softwareSerial to communicate with mp3.
    Serial.println(F("Unable to begin:"));
    Serial.println(F("1.Please recheck the connection!"));
    Serial.println(F("2.Please insert the SD card!"));
    while(true);
  }
  Serial.println(F("DFPlayer Mini online."));

  myDFPlayer.volume(25);  //Set volume value. From 0 to 30
  myDFPlayer.EQ(DFPLAYER_EQ_POP);
  myDFPlayer.play(1);  //Play the first mp3

}

void loop()
{
  /*
  static unsigned long timer = millis();

  if (millis() - timer > 0) {
    timer = millis();
    myDFPlayer.next();  //Play next mp3 every 3 second.
  }
  */
  if(digitalRead(PIN_BUSY) == HIGH){
    delay(1000);
    myDFPlayer.next();  //Play next mp3 every 3 second.
  }
  else{
    delay(500);
  }

  if (myDFPlayer.available()) {
    printDetail(myDFPlayer.readType(), myDFPlayer.read());
    //Print the detail message from DFPlayer to handle different errors and states.
  }
}

void printDetail(uint8_t type, int value){
  switch (type) {
    case TimeOut:
      Serial.println(F("Time Out!"));
      break;
    case WrongStack:
      Serial.println(F("Stack Wrong!"));
      break;
    case DFPlayerCardInserted:
      Serial.println(F("Card Inserted!"));
      break;
    case DFPlayerCardRemoved:
      Serial.println(F("Card Removed!"));
      break;
    case DFPlayerCardOnline:
      Serial.println(F("Card Online!"));
      break;
    case DFPlayerPlayFinished:
      Serial.print(F("Number:"));
      Serial.print(value);
      Serial.println(F(" Play Finished!"));
      break;
    case DFPlayerError:
      Serial.print(F("DFPlayerError:"));
      switch (value) {
        case Busy:
          Serial.println(F("Card not found"));
          break;
        case Sleeping:
          Serial.println(F("Sleeping"));
          break;
        case SerialWrongStack:
          Serial.println(F("Get Wrong Stack"));
          break;
        case CheckSumNotMatch:
          Serial.println(F("Check Sum Not Match"));
          break;
        case FileIndexOut:
          Serial.println(F("File Index Out of Bound"));
          break;
        case FileMismatch:
          Serial.println(F("Cannot Find File"));
          break;
        case Advertise:
          Serial.println(F("In Advertise"));
          break;
        default:
          break;
      }
      break;
    default:
      break;
  }
}
基于nodeMCU的MQTT 触摸开关
// Arduino MQTT Client 库  https://github.com/knolleary/pubsubclient
#include <PubSubClient.h>

// ESP8266 库
#include <ESP8266HTTPClient.h>
#include <ESP8266WiFi.h>

String key,value,times;
String response;
int relayPin = D0; // 保留用于继电器针脚,可以控制外部电源开关,针对在背面
int ledPin = 2;

WiFiClient espClient;
PubSubClient client(espClient);

const char* ssid = "upyun.com";
const char* password = "123123FFFFFF"; // wifi认证用户和密码
const char* ussid = "NodeMCU";
const char* upassword = "1818181818";
const char* mqtt_server = "211.155.84.61";
const int mqtt_port = 1883;
const String httpPost =   "POST / HTTP/1.1\r\n"
                          "Host: shaohy.17geek.us\r\n"
                          "User-Agent: Arduino/1.0\r\n"
                          "Content-Type: application/x-www-form-urlencoded;\r\n"
                          "\r\n";
//WiFiServer server(88);  // esp8266 不作服务端

void ledControl(int key,int value,int times){
  for(int i=0;i<times;i++) {
    digitalWrite(ledPin,HIGH);
    delay(value);                      // wait one second
    digitalWrite(ledPin,LOW);
    delay(value);                      // wait one second
  }
}

void setup()
{
  Serial.begin(115200);
  // 初始化esp8266 wifi无线连接
  // WIFI_STA为站点模式,WIFI_AP为访问接入点模式,WIFI_AP_STA为访问接入点和站点的混合模式
  WiFi.mode(WIFI_AP_STA);
  delay(100);

  Serial.printf("Connecting to %s ", ssid); // 连接公司的无线
  WiFi.begin(ssid, password);
  Serial.print("Setting soft-AP ... ");   // 创建自己的WPA2-PSK 无线网络
  Serial.println(WiFi.softAP(ussid, upassword)?"Ready":"Failed!");

  while (WiFi.status() != WL_CONNECTED)
    {
      delay(500);
      Serial.print(".");
    }
  Serial.println(" connected");
  Serial.printf("Web server started, open %s in a web browser\n", WiFi.localIP().toString().c_str());

  pinMode(relayPin,INPUT);
  pinMode(ledPin,OUTPUT);

  // 初始化Arduino MQTT
  client.setServer(mqtt_server, mqtt_port);
}

void loop() {
  delay(500);
  if(digitalRead(relayPin) == HIGH){
      if (!client.connected()){
        Serial.print("-> Attempting MQTT connection...");
        String clientId = "ESP8266Client-";
        clientId += String(random(0xffff), HEX);
        // Attempt to connect
        if (client.connect(clientId.c_str())) {
          Serial.println("connected");
          client.publish("inTopic","on,180,10");
          }
        }
        else{
          Serial.println("-> Already connect MQTT.");
          client.publish("inTopic","on,180,10");
        }
  }
}
ESP32 WROOM
ESP32-C3 实验案例
常见开发芯片
其中进行连接的是使用STAIF模式,如果使用APIF,则是将ESP32作为一个热点。
MQTT相关准备
mqtt:新建用户名和密码
mosquitto_passwd -b -c pwfile shaohy upyun.com
mosquitto_passwd -D pwfile shaohy
mqtt:配置用户ACL规则
user shaohy
topic online/#
mqtt:用户认证并订阅频道
mosquitto_sub -h 127.0.0.1 -p 1883 -t online/office -u shaohy -P upyun.com
mqtt:用户认证并发送消息
mosquitto_pub -h 127.0.0.1 -t online/office -u shaohy -P upyun.com -m "我在公司"
发送端: PyWifi发布订阅消息
from umqttsimple import MQTTClient
from time import sleep_ms, time
from machine import Pin, reset

# 定义一些变量
ssid = "Upyun-Guest"
passwd = "1688@upyun"
client_id = "esp32-shaohy"
mqtt_server = "devops.upyun.com"
mqtt_user = "shaohy"
mqtt_pass = "upyun.com"
topic_sub = "online/#"
topic_pub = "online/office"
last_message = 0      # 最近发消息的时间戳
message_interval = 30 # 间隔多少时间发送一次消息

def wifi_connect():
    import network
    wlan = network.WLAN(network.STA_IF)
    wlan.active(True)
    while not wlan.isconnected():
        print('Connecting to WiFi network ...')
        wlan.connect(ssid, passwd)
        sleep(5)
    print('WiFi Network Info:', wlan.ifconfig())
    do_ledon(3)

# 订阅频道,接受消息并处理
def sub_cb(topic, msg):
    print((topic, msg))
    msgarray = msg.split()
    if msgarray[0] == b'online':
        if len(msgarray) > 1:
            do_ledon(int(msgarray[1]))
        else:
            do_ledon()

# 连接并订阅频道
def connect_and_subscribe():
    global client_id, mqtt_server, topic_sub
    wifi_connect()

    client = MQTTClient(client_id, mqtt_server, user=mqtt_user, password=mqtt_pass)
    client.set_callback(sub_cb)
    client.connect()
    #client.subscribe(topic_sub)
    print('Connected to %s MQTT broker, publish to %s topic' % (mqtt_server, topic_pub))
    return client

def restart_and_reconnect():
    print('Failed to connect to MQTT broker. Reconnecting...')
    time.sleep(10)
    machine.reset()

def do_ledon(looptime=100):
    led = Pin(2, Pin.OUT)
    i = 0
    while i < looptime:
        i += 1
        led.on()
        sleep_ms(500)
        led.off()
        sleep_ms(500)
    led.off()

if __name__ ==  '__main__':
    try:
        client  = connect_and_subscribe()
        while True:
            client.check_msg()
            if (time() - last_message) > message_interval:
                msg = b'online'
                client.publish(topic_pub, msg)
                do_ledon(5)
                last_message = time()
    except Exception as e:
        restart_and_reconnect()
接收端: wifi和mqtt的实例
from umqtt.simple import MQTTClient
from time import sleep, sleep_ms, time
from machine import Pin, reset

# 定义一些变量
ssid = "Upyun-Guest"
passwd = "1688@upyun"
client_id = "esp32-shaohy"
mqtt_server = "devops.upyun.com"
mqtt_user = "shaohy"
mqtt_pass = "upyun.com"
topic_sub = "online/#"
topic_pub = "online/shaohy"

def wifi_connect():
    import network
    wlan = network.WLAN(network.STA_IF)
    wlan.active(True)
    while not wlan.isconnected():
        print('Connecting to WiFi network ...')
        wlan.connect(ssid, passwd)
        sleep(5)

    print('WiFi Network Info:', wlan.ifconfig())
    do_ledon(5)

# 订阅频道,接受消息并处理
def sub_cb(topic, msg):
    print((topic, msg))
    msgarray = msg.split()
    if msgarray[0] == b'online':
        if len(msgarray) > 1:
            do_ledon(int(msgarray[1]))
        else:
            do_ledon()


# 连接并订阅频道
def connect_and_subscribe():
    global client_id, mqtt_server, topic_sub
    wifi_connect()

    client = MQTTClient(client_id, mqtt_server, user=mqtt_user, password=mqtt_pass)
    client.set_callback(sub_cb)
    client.connect()
    client.subscribe(topic_sub)
    print('Connected to %s MQTT broker, subscribed to %s topic' % (mqtt_server, topic_sub))
    return client

def restart_and_reconnect():
    print('Failed to connect to MQTT broker. Reconnecting...')
    sleep(10)
    reset()

def do_ledon(looptime=900):
    import neopixel

    np = neopixel.NeoPixel(Pin(8), 8, bpp=3)
    duration = 5
    r, g, b = 255, 0, 0
    i = 0
    while i < looptime:
        #print(f"LED color: R={r:.0f}, G={g:.0f}, B={b:.0f}")
        i += 1
        np[0] = (r, g, b)
        np.write()
        sleep_ms(30)

        r -= duration
        b += duration

        if r == 0 or b == 0:
            duration = - duration
    sleep(3)
    np[0] = (0, 255, 0)
    np.write()

if __name__ ==  '__main__':
    try:
        client  = connect_and_subscribe()
        while True:
            client.check_msg()
            if (time() - last_message) > message_interval:
                msg = b'online'
                client.publish(topic_pub, msg)
                do_ledon(5)
                last_message = time()
    except Exception as e:
        restart_and_reconnect()
ESP32-S3 with I2S
INMP441

import machine
import uos
import utime

# 配置 I2S 参数
SAMPLE_RATE = 16000  # 采样率,单位:Hz
SAMPLE_SIZE_IN_BITS = 16  # 采样位深度,单位:位
CHANNELS = 1  # 声道数
BUFFER_LENGTH_IN_BYTES = 4096  # 缓冲区长度

# 配置 I2S 引脚
WS_PIN = 4
SCK_PIN = 5
SD_PIN = 6

# 初始化 I2S 对象
i2s = machine.I2S(
    0,
    sck=machine.Pin(SCK_PIN),
    ws=machine.Pin(WS_PIN),
    sd=machine.Pin(SD_PIN),
    mode=machine.I2S.RX,
    bits=SAMPLE_SIZE_IN_BITS,
    format=machine.I2S.MONO if CHANNELS == 1 else machine.I2S.STEREO,
    rate=SAMPLE_RATE,
    ibuf=BUFFER_LENGTH_IN_BYTES
)

# 定义 WAV 文件头生成函数
def generate_wav_header(sample_rate, sample_size_in_bits, channels, num_samples):
    file_size = 36 + num_samples * channels * (sample_size_in_bits // 8)
    header = bytearray()

    # 构建 RIFF 块
    header.extend(b'RIFF')
    header.extend(file_size.to_bytes(4, 'little'))
    header.extend(b'WAVE')

    # 构建 fmt 子块
    header.extend(b'fmt ')
    header.extend(16 .to_bytes(4, 'little'))  # 子块 1 大小
    header.extend(1 .to_bytes(2, 'little'))  # 音频格式(PCM = 1)
    header.extend(channels.to_bytes(2, 'little'))
    header.extend(sample_rate.to_bytes(4, 'little'))
    byte_rate = sample_rate * channels * (sample_size_in_bits // 8)
    header.extend(byte_rate.to_bytes(4, 'little'))
    block_align = channels * (sample_size_in_bits // 8)
    header.extend(block_align.to_bytes(2, 'little'))
    header.extend(sample_size_in_bits.to_bytes(2, 'little'))

    # 构建 data 子块
    header.extend(b'data')
    data_size = num_samples * channels * (sample_size_in_bits // 8)
    header.extend(data_size.to_bytes(4, 'little'))

    return header

# 录音函数
def record_audio(duration, filename):
    num_samples = SAMPLE_RATE * duration
    buffer = bytearray(BUFFER_LENGTH_IN_BYTES)
    samples_written = 0

    # 生成 WAV 文件头
    header = generate_wav_header(SAMPLE_RATE, SAMPLE_SIZE_IN_BITS, CHANNELS, num_samples)

    # 打开文件以写入模式
    with open(filename, 'wb') as f:
        # 写入 WAV 文件头
        f.write(header)

        start_time = utime.ticks_ms()
        while samples_written < num_samples * (SAMPLE_SIZE_IN_BITS // 8):
            num_read = i2s.readinto(buffer)
            if num_read > 0:
                f.write(buffer[:num_read])
                samples_written += num_read
            elapsed_time = utime.ticks_diff(utime.ticks_ms(), start_time)
            if elapsed_time >= duration * 1000:
                break

    print(f"录音完成,文件已保存为 {filename}")

# 录音时长(秒)
RECORD_DURATION = 10
# 保存的文件名
RECORD_FILENAME = "recording.wav"

# 开始录音
record_audio(RECORD_DURATION, RECORD_FILENAME)

# 关闭 I2S 接口
i2s.deinit()